-
Start saving money now. Easily learn how to perform routine maintenance, oil change, and safety inspection on your Harley Davidson with a Pre-Milwaukee-Eight engine.
-
Do it in your garage or on your patio right on the kickstand! No specialty tools or jacks required.
- GET OUR MILWAUKEE-EIGHT OIL CHANGE, SERVICE, AND SAFETY INSPECTION VIDEO HERE!
A Video by Bikers for Bikers!
An easy to follow step-by-step tutorial video.
I GUARANTEE YOU CAN DO IT!
In this tutorial video made by bikers for bikers we teach you how to perform routine maintenance, oil change, and safety inspection on your Harley Davidson with a Pre-Milwaukee-Eight engine. It doesn't matter which model Harley you have, as you will be provided multiple video files covering different models.
Note: You can get our Harley Milwaukee-Eight Oil Change, Service, & Safety Inspection Video Here!
What years & makes will this video work for exactly?
- The video is good for 88, 96, 103, & 110 CI motors & CVO models. The V-Twin motors, oil plugs, air filters, oil filters, frames, brakes, belts, levers, and other components are basically the same for these models and for many years back to the early 2000's.
- Examples Touring: Road King, Street Glide, Street Glide Special, Road Glide, Road Glide Special, Electra Glide Ultra Classic, Electra Glide Ultra Classic Low, Ultra Limited, Ultra Limited Low, Street Bob, Low Rider, Fat Bob, Wide Glide, Switchback, CVO Models, Etc…..
- Examples Dyna Models: Wide Glide, Street Bob, Fab Bob, Low Rider, Switchback, Etc…..
- Sportsters and Softail models are only slightly different as far as oil tanks and drain plugs. You will get multiple video files and we specifically show you the differences and locations in detail on these models.
- Examples Softail & Sportsters: Softail Custom, Softail Slim, Softail Night Train, Fat Boy, Fat Boy Lo, Heritage Softail Classic, Softail Deluxe, Breakout, Super Low, Iron 883, 1200 Custom, Seventy-Two, Forty-Eight, SuperLow 1200T, Etc……
- If you get this video and you feel it does not pertain at all to your year or model of Harley then let us know and we will give you a full refund. Our mission here is to help bikers & that is our guarantee.
Servicing your Harley Davidson yourself DOES NOT void your warranty in any way and that is a FACT! We have spoken directly to many Harley Davidson Service Managers and Mechanics over the years and nothing has changed.There are a couple of items you need to retain to keep your warranty in tact and this is discussed within.
Get our Milwaukee-Eight Harley-Davidson Oil Change & Maintenance Video Here!
Much effort & detail went into the filming & producing this video to give you the best possible views. You simply will not find a more detailed instructional video out there on this topic. We also give you some extra info and talk about other Harley related mechanical things in this video.
This service video will work for Harley's dating many years back and likely future models. Harley has not changed the placement of items, such as drain plugs etcetera for many years now. The motors have gotten bigger, but the basics have stayed the same.
This video will also get you right on track for servicing other models of Harley Davidson's, but certain items might be in slightly different locations. It will give you the foundation you need to move forward and take it on!
Harley Davidson Dealerships charge $300 plus for this basic service and easy safety inspection every 5,000 miles. To do this service yourself, all you need is this video, synthetic oil, and oil filter that costs between $100-$125. Then all you need is 1 hour of your time and you are done!
Now, imagine all the time and money you will save by not taking your motorcycle to the dealership every 5,000 miles and paying $300 plus for something you can easily do for much cheaper at your home.
For the low price of this video, you will be saving several thousands of dollars over the life of your Harley! Then you can put that money back into something worthwhile, like parts to dress up your Harley-right?-LOL
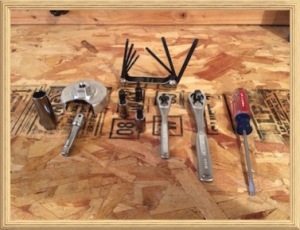
You don't need any real fancy tools, jack, or motorcycle lift for this. You can do this service and safety inspection right on the kickstand. We have done it this way for many years and serviced many Harley's. Here is a list of the simple tools you will need:
* Small Standard Screwdriver
* 3/8″ Ratchet
* 1/4″ Ratchet
* 3″ Extension for 3/8″ Ratchet
* 5/8″ Standard Socket
* 3/8″ Hex Socket for 3/8″ Ratchet (or just a Hex Drive Tool)
* 5/16″ Hex Socket for 3/8″ Ratchet (or just a Hex Drive Tool)
* Torx Drive Tool w/ size T-27 (or a Torx Socket for a 1/4″ Ratchet)
* Multi type Torx Tool w/ size T-27
* Oil Filter Removal Wrench w/ Cutout-Here is the part description and Harley part number (End Cap Oil Filter Wrench-94863-10)($10.95)
* Oil Drain Pan
* Funnel
Further, we talk about specification and capacities and break it down for you and for real life applications. We keep it simple, as it does not need to be difficult. This is really an easy thing to do! You will be kicking yourself for wasting money and wondering why you never did it yourself before.
There are no surprises in this video and we are completely confident you will be able to service your Harley Davidson completely on you own after viewing this video. We truly hope it helps many Harley Davidson owners save a ton of money and discover the joys of wrenching on your own bike!
So what are you waiting for? Get the video NOW and stop wasting your hard earned money! Tell other riders and friends about this video.
Keep the rubber side down and the shiny side up! Ride